Get Started with Flows
A flow is a group of interconnected nodes capable of transferring data from one node to another.
Each node has a distinctive function. If nodes are wired together and you deploy the flow, a given data is passed, in succession, from one node to another as a JSON format message and processed according to the function assigned to each node. For node function description and configuration requirements, click a node and see the INFO display in the sidebar.
The flow-based programming editor makes writing application features easier to a wider audience.
For example, you can create a flow using the function node that requires JavaScript knowledge to configure it.
- From the node palette, select the function node and drag it onto the flow workspace.
- Double-click the node to open Edit function node.
- In the Edit function node:
- Type in the Name of the node.
- Insert the Function. For example:
var age = msg.payload.value.age; if(age < 18) { msg.payload= "Too young" } else { msg.payload= "OK" } return msg; - Click Done.
The same flow can be created using other nodes with a minimum of coding by deconstructing the problem into simple steps and identifying a node suitable for each step.
In this case, the switch node and the change node can perform the same action based on conditions as the function node.
- From the node palette, select the switch node and drag it onto the flow workspace.
- Double-click the node to open Edit switch node.
- In the Edit switch node:
- Type in the Name of the node.
- Set the message Property values based on which it is directed.
- Add and configure the Rules using the drop-down list for each of them.
- Click Done. The switch node has now an output port for each rule.
- From the node palette, select and drag onto the flow workspace a change node for each rule.
- Double-click the node to open Edit change node.
- In the Edit change node:
- Type in the Name of the node.
- From the operations drop-down list available for Rules, select Set to assign a property to a value. In this case, the
msg. payloadfor one of the nodes is set to “Too young” and for the other one is set to “OK”.
- Click Done.
- Wire the switch node and the change nodes together. Click and drag a wire from the output port of the switch node to the corresponding input port of the change node and release. Do the same with the other change node.
After wiring nodes, the following indicators can be displayed on the nodes:
- The blue small circle on the node indicates unsaved changes. Save the changes by clicking Deploy in the top right corner. After deploying, the small blue circle disappears, meaning that the changes are saved and the nodes are live.
- The red small triangle on the node indicates an error in configuring the node. Double-click the node again and look for error highlights. Correct and click Done. If the errors are solved, the small red triangle disappears, meaning that you can now save the changes by clicking Deploy.
Now that the problem is defined in two different ways, using different nodes, an input node is required to send a message and to trigger the nodes. This is the main purpose of the inject node – to inject a message into the flow.
- From the node palette, select the inject node and drag it onto the flow workspace.
- Double-click the node to open Edit inject node.
- In the Edit inject node:
- Select from the drop-down list the Payload message type and write the message. For this example, a JSON payload is required:
{"value":{"age":14}}. - A message can be sent manually by clicking the left triggering button of the node, or automatically by selecting the Inject once checkbox and then setting the timing.
- A message can also be sent at a regular interval. Select from the Repeat drop-down list one of the available options and configure the timing.
- Type in the Name of the node.
- Select from the drop-down list the Payload message type and write the message. For this example, a JSON payload is required:
- Click Done.
- Add an inject node for each flow. In this case, an inject node is wired with the function node and another inject node is wired with the switch node.
The injected message needs a destination, or an output node that can receive a message after it is processed by the nodes in the flow. The debug node receives the result message and displays it in the sidebar, when the DEBUG tab is selected.
- From the node palette, select the debug node and drag it onto the flow workspace.
- Double-click the node to open Edit debug node and type in the Name.
- Click Done.
- Add a debug node for each flow. In this case, a debug node is wired with the function node and another debug node is wired with the change nodes.
The flows are now completed and ready to be used:
- Click Deploy to save and activate the flow.
- Click the DEBUG tab in the sidebar to see the messages once they are received by the debug nodes.
- Click the inject nodes and see the DEBUG display in the sidebar.
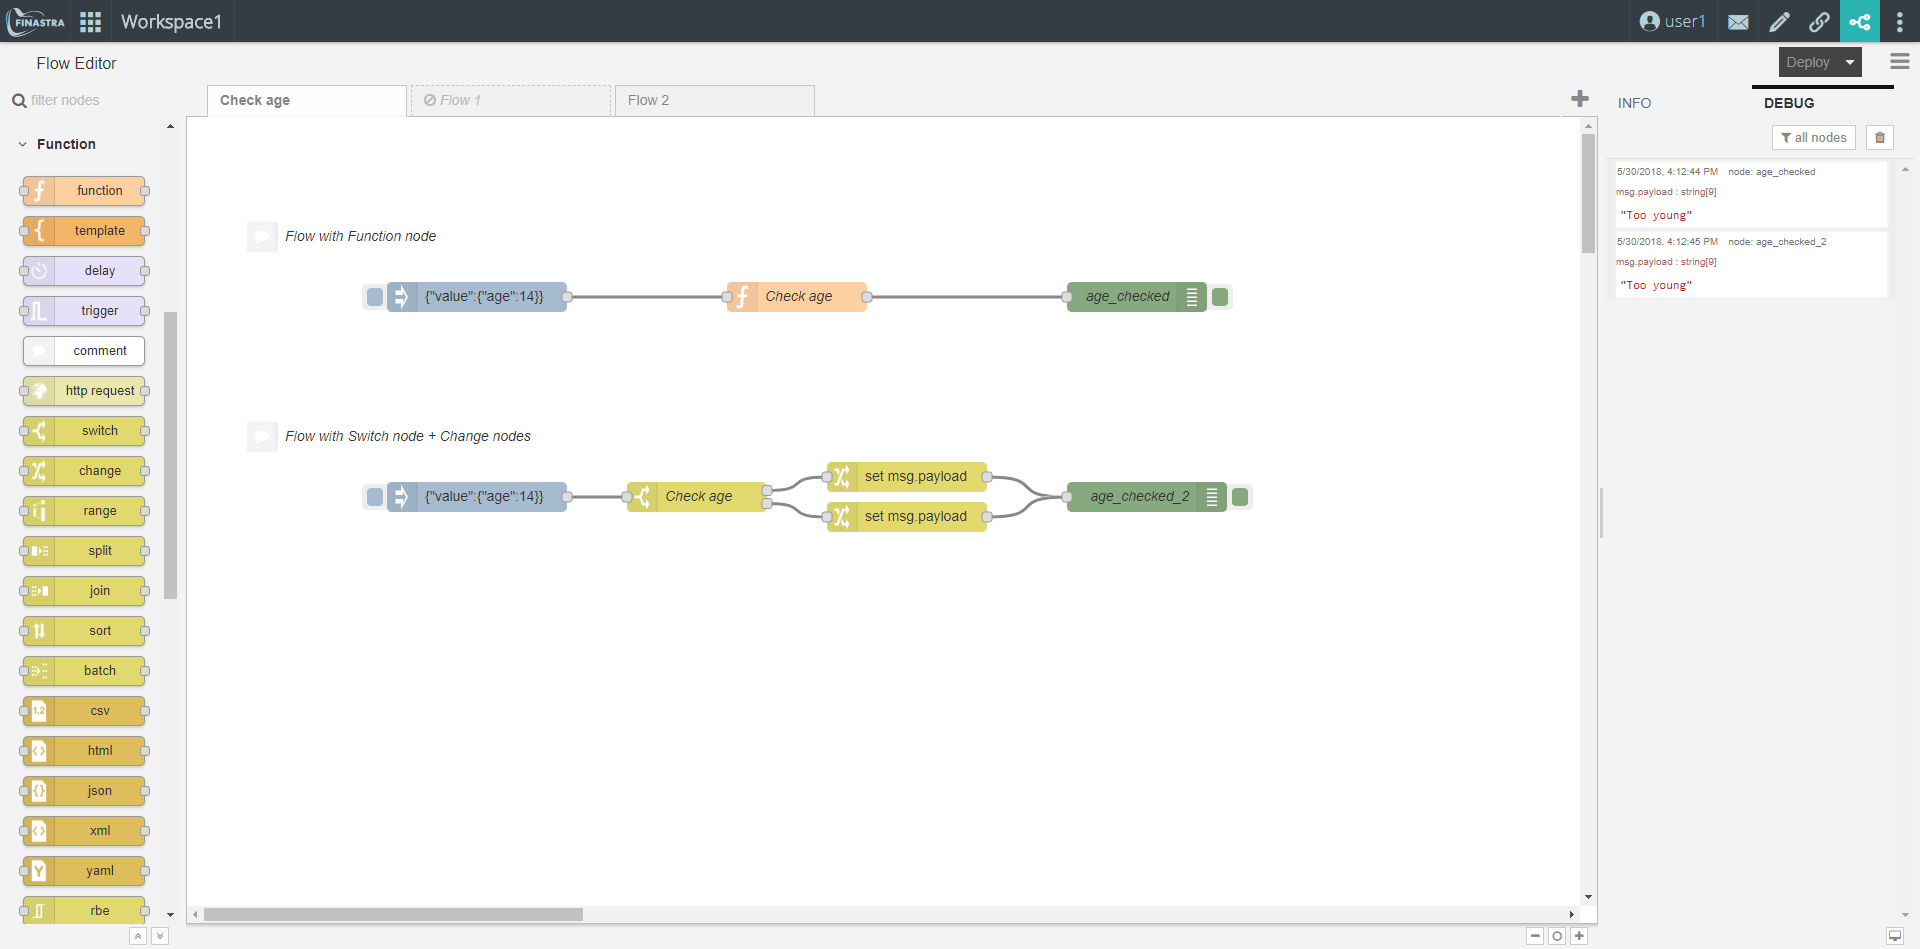
Fig. 9: Same Output from Two Different Flows.
Both inject nodes send the payload {"value":{"age":14}} into the flow. Both flows use the same conditional evaluation to process the message, but with different nodes that have different functions. Once the message is received by the debug nodes, the same output is displayed in the sidebar: Too young.